Displaying Local Airport Departures
A colleague was working on a project to present a local airport’s departures on a display monitor. There are many APIs out there that can provide flight data, but most of them are overkill for a single airport, with few flights in and out each day. Even with expensive (but comprehensive) API data, there’s still a need to make the display at least a little bit presentable, for the end users who are checking their flights’ status. We’ll serve a simple webpage that displays this info, without all the extra clutter that comes with the airport’s main site.
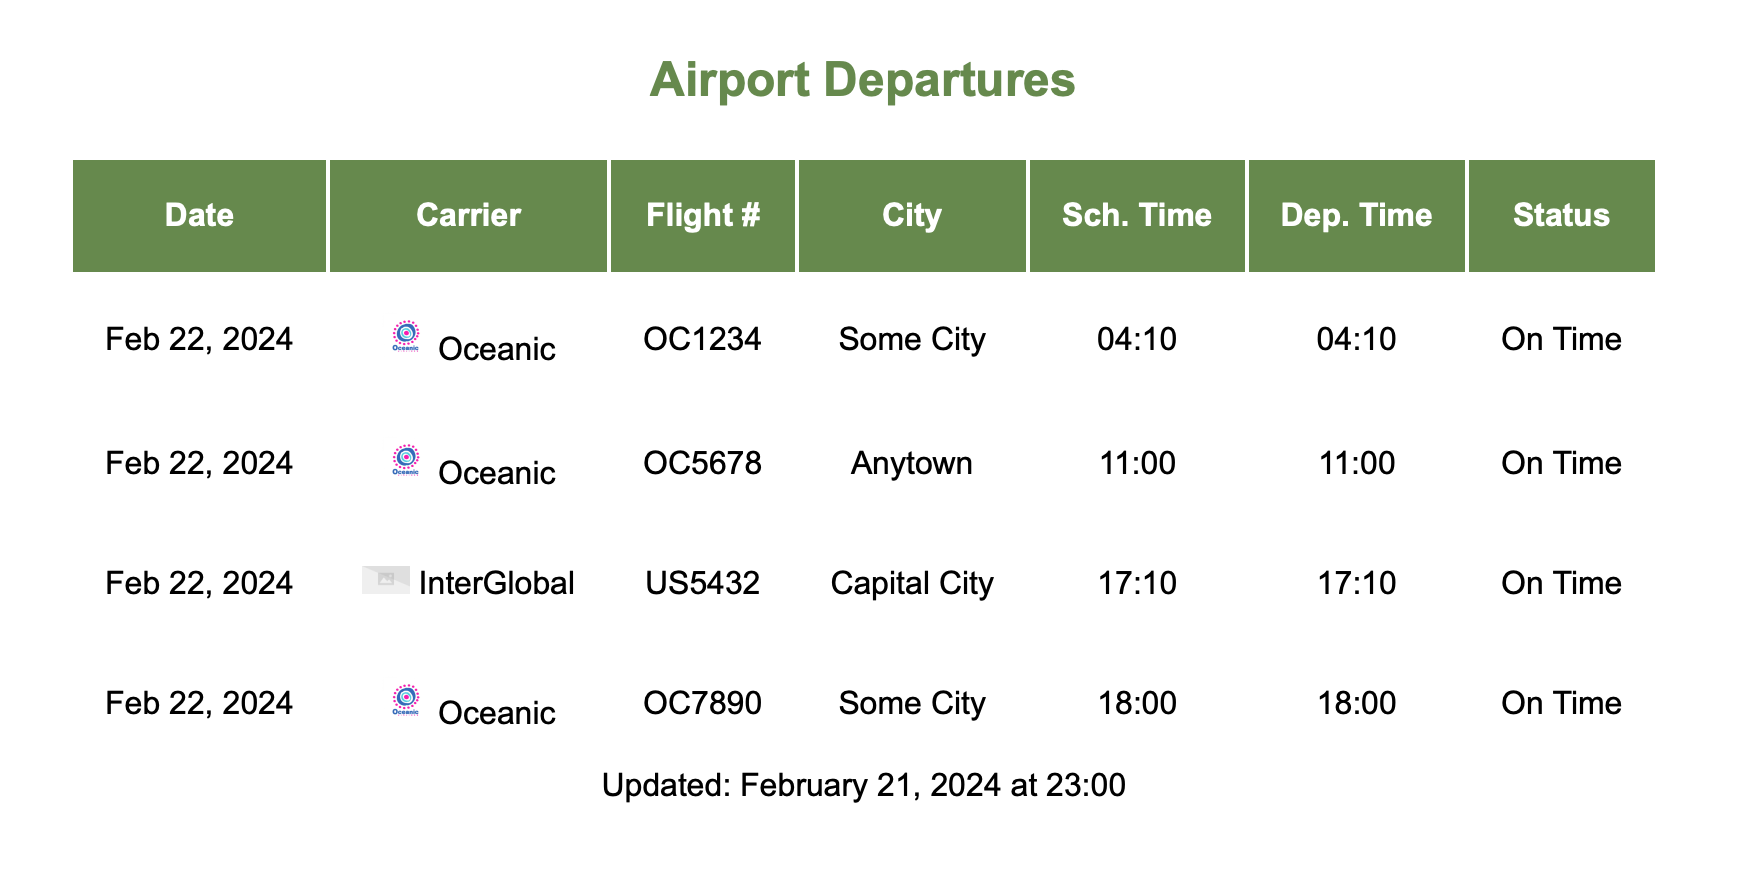
This project uses a self-hosted N8N environment to serve the latest departure information from the airport’s website. N8N provides an easy interface to build a wide range of automations, and has proven to be very powerful as I’ve explored it over the last few months. I’m not here to shill for their company, but I highly recommend it, from what I’ve been able to do with it so far.
And yes, there are puns.
10,000’ View#
The general logic we’ll use for this project can be applied to any given set of tools, but this automation only has a few steps. The flow:
- listens for an incoming request using a webhook, then
- makes a request to the airport’s site, and
- extracts the relevant table for flight departures, before
- dumping the table into a new HTML template, and
- responding to the webhook with the new webpage template.
Within N8N, it looks like this:

Each of the nodes in that screenshot acts as a function. It has some sort of input and some sort of output. Nodes can be stitched together to make some very complex flows, the same as any “hand-written” program made of code functions. Let’s take a closer look into each of the nodes in that screenshot, and walk through what each step is actually doing.
Taking Off#
Any automation flow requires a defined trigger. We’re going to use a Webhook node. The webhook used in this flow can be replaced by a script scheduled via cron job, if we chose not to use N8N, but the subsequent steps would be essentially the same. Ultimately, we need to serve a page at the end of this flow, and webhooks are the way to do that within N8N. See Publishing and refining our flow below for some other benefits of changing the trigger.
Why all the talk about N8N?
I initially built this project as a python script, and it took hardly any time at all. But, that was hard to share without ensuring the person I’m sharing with has easy access to a dev environment etc etc.
One of the biggest ways N8N has helped me build automations and quickly iterate on random projects is the incredibly easy-to-use pre-built nodes. There are only a couple types shown in the screenshot above, but there are hundreds built-in, and more that are provided by their community. Its drag-and-drop builder makes it very simple to handle transforming data as it works through a series of nodes, but possibly my favourite part is that it provides a basic webserver framework, so I don’t have to constantly keep working on a backend in a local environment for a quick dumbass idea, and I can easily share the results with less technical people.
Step 1: Webhook node#
This node basically just waits until someone makes a request to a specific URL. Once it receives that request, the rest of the flow is initiated.
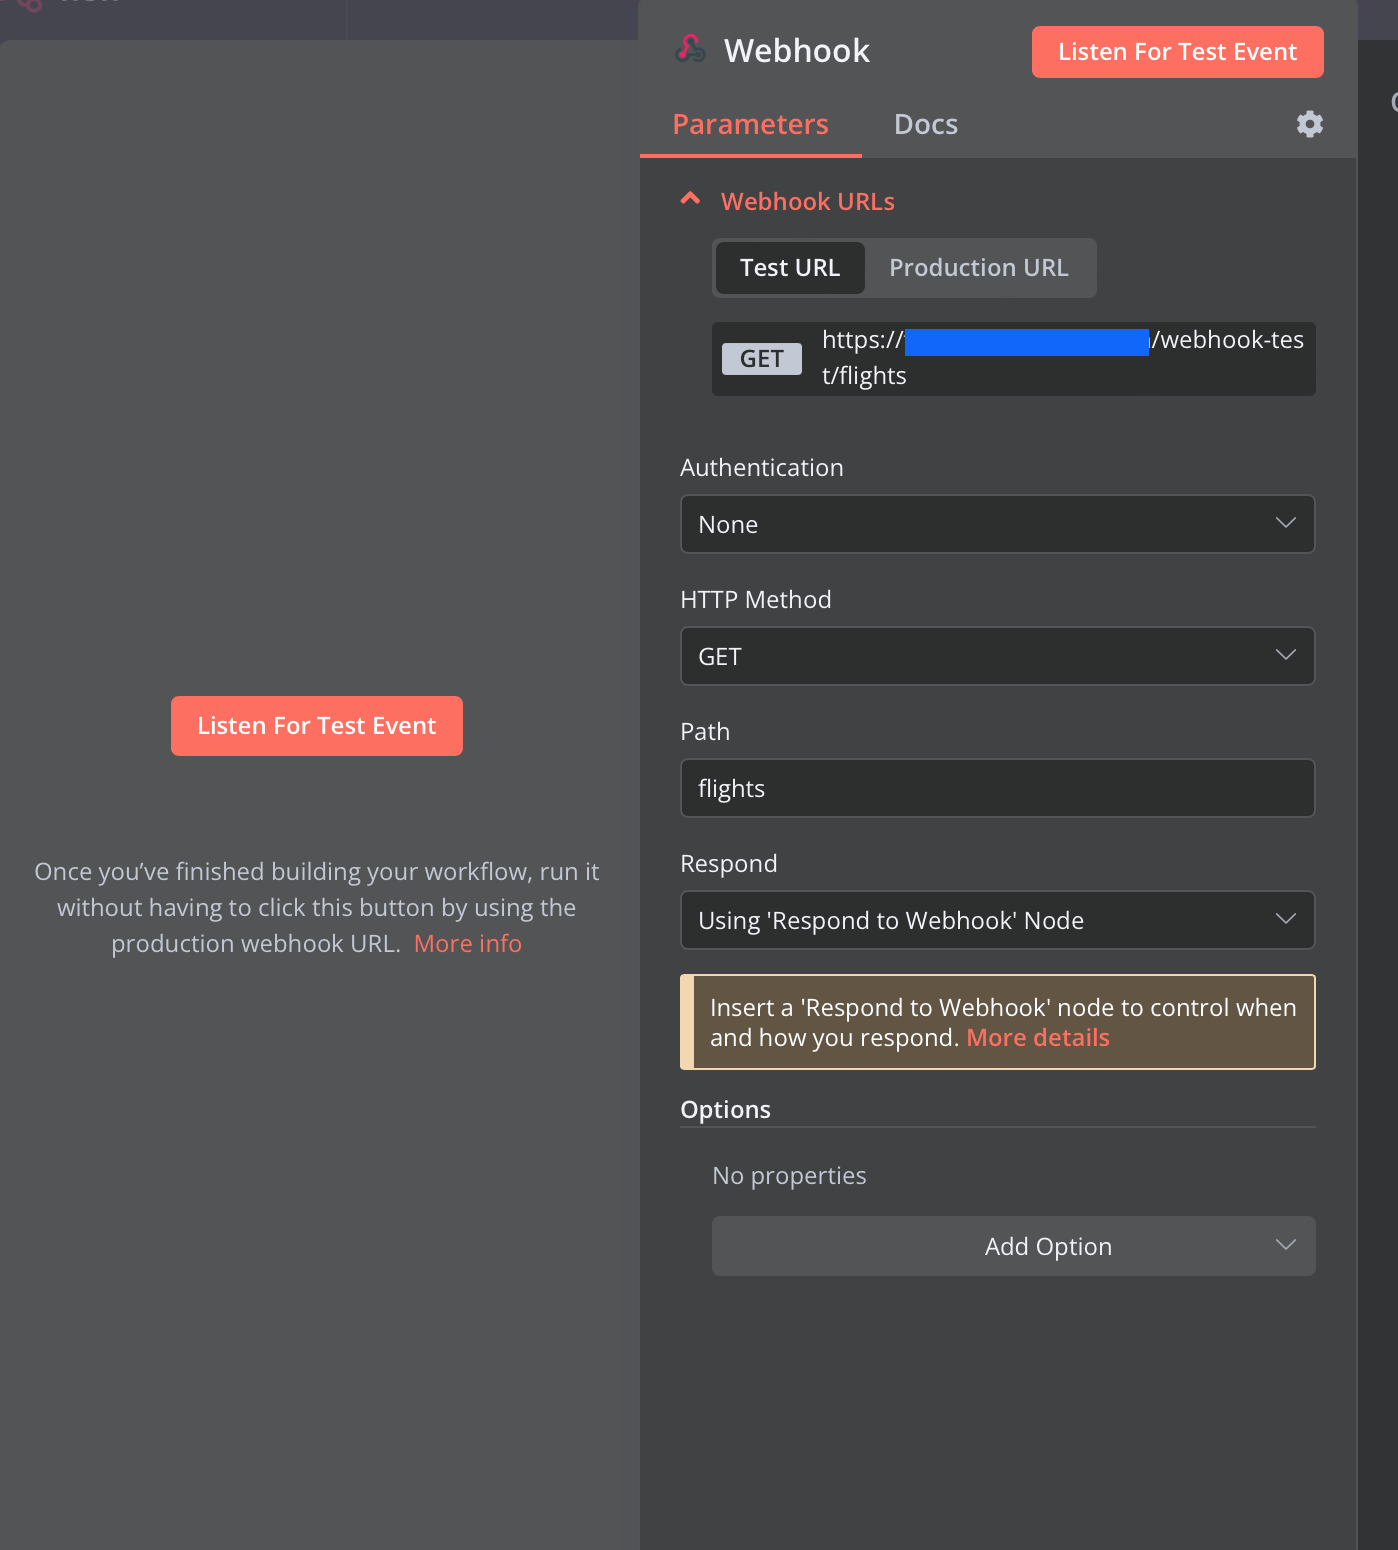
The important part of this node is the Respond setting at the bottom of the image, which is set to respond “Using ‘Respond Using Webhook’ Node”.
I accidentally forgot that setting…
I was fiddling with my final template for way too long, wondering why my formatting didn’t get applied, I won’t lie. N8N has a lot of different nodes and settings, and sometimes it’s easy to forget to tick a box!
Step 2: GET Airport Site node#
Once the flow is triggered by the webhook, this node makes a GET request to the airport’s website. The specific site targeted by this flow uses straight HTML on its pages, and the response to the GET request is a messy pile of HTML, but a straightforward one.
Dynamic sites
Our source site is updated frequently, but it doesn’t load data using JavaScript, and there are no extra navigation steps or input forms to worry about. Other sites might require additional steps to load the appropriate elements into the page, which could be harder to do directly in N8N.
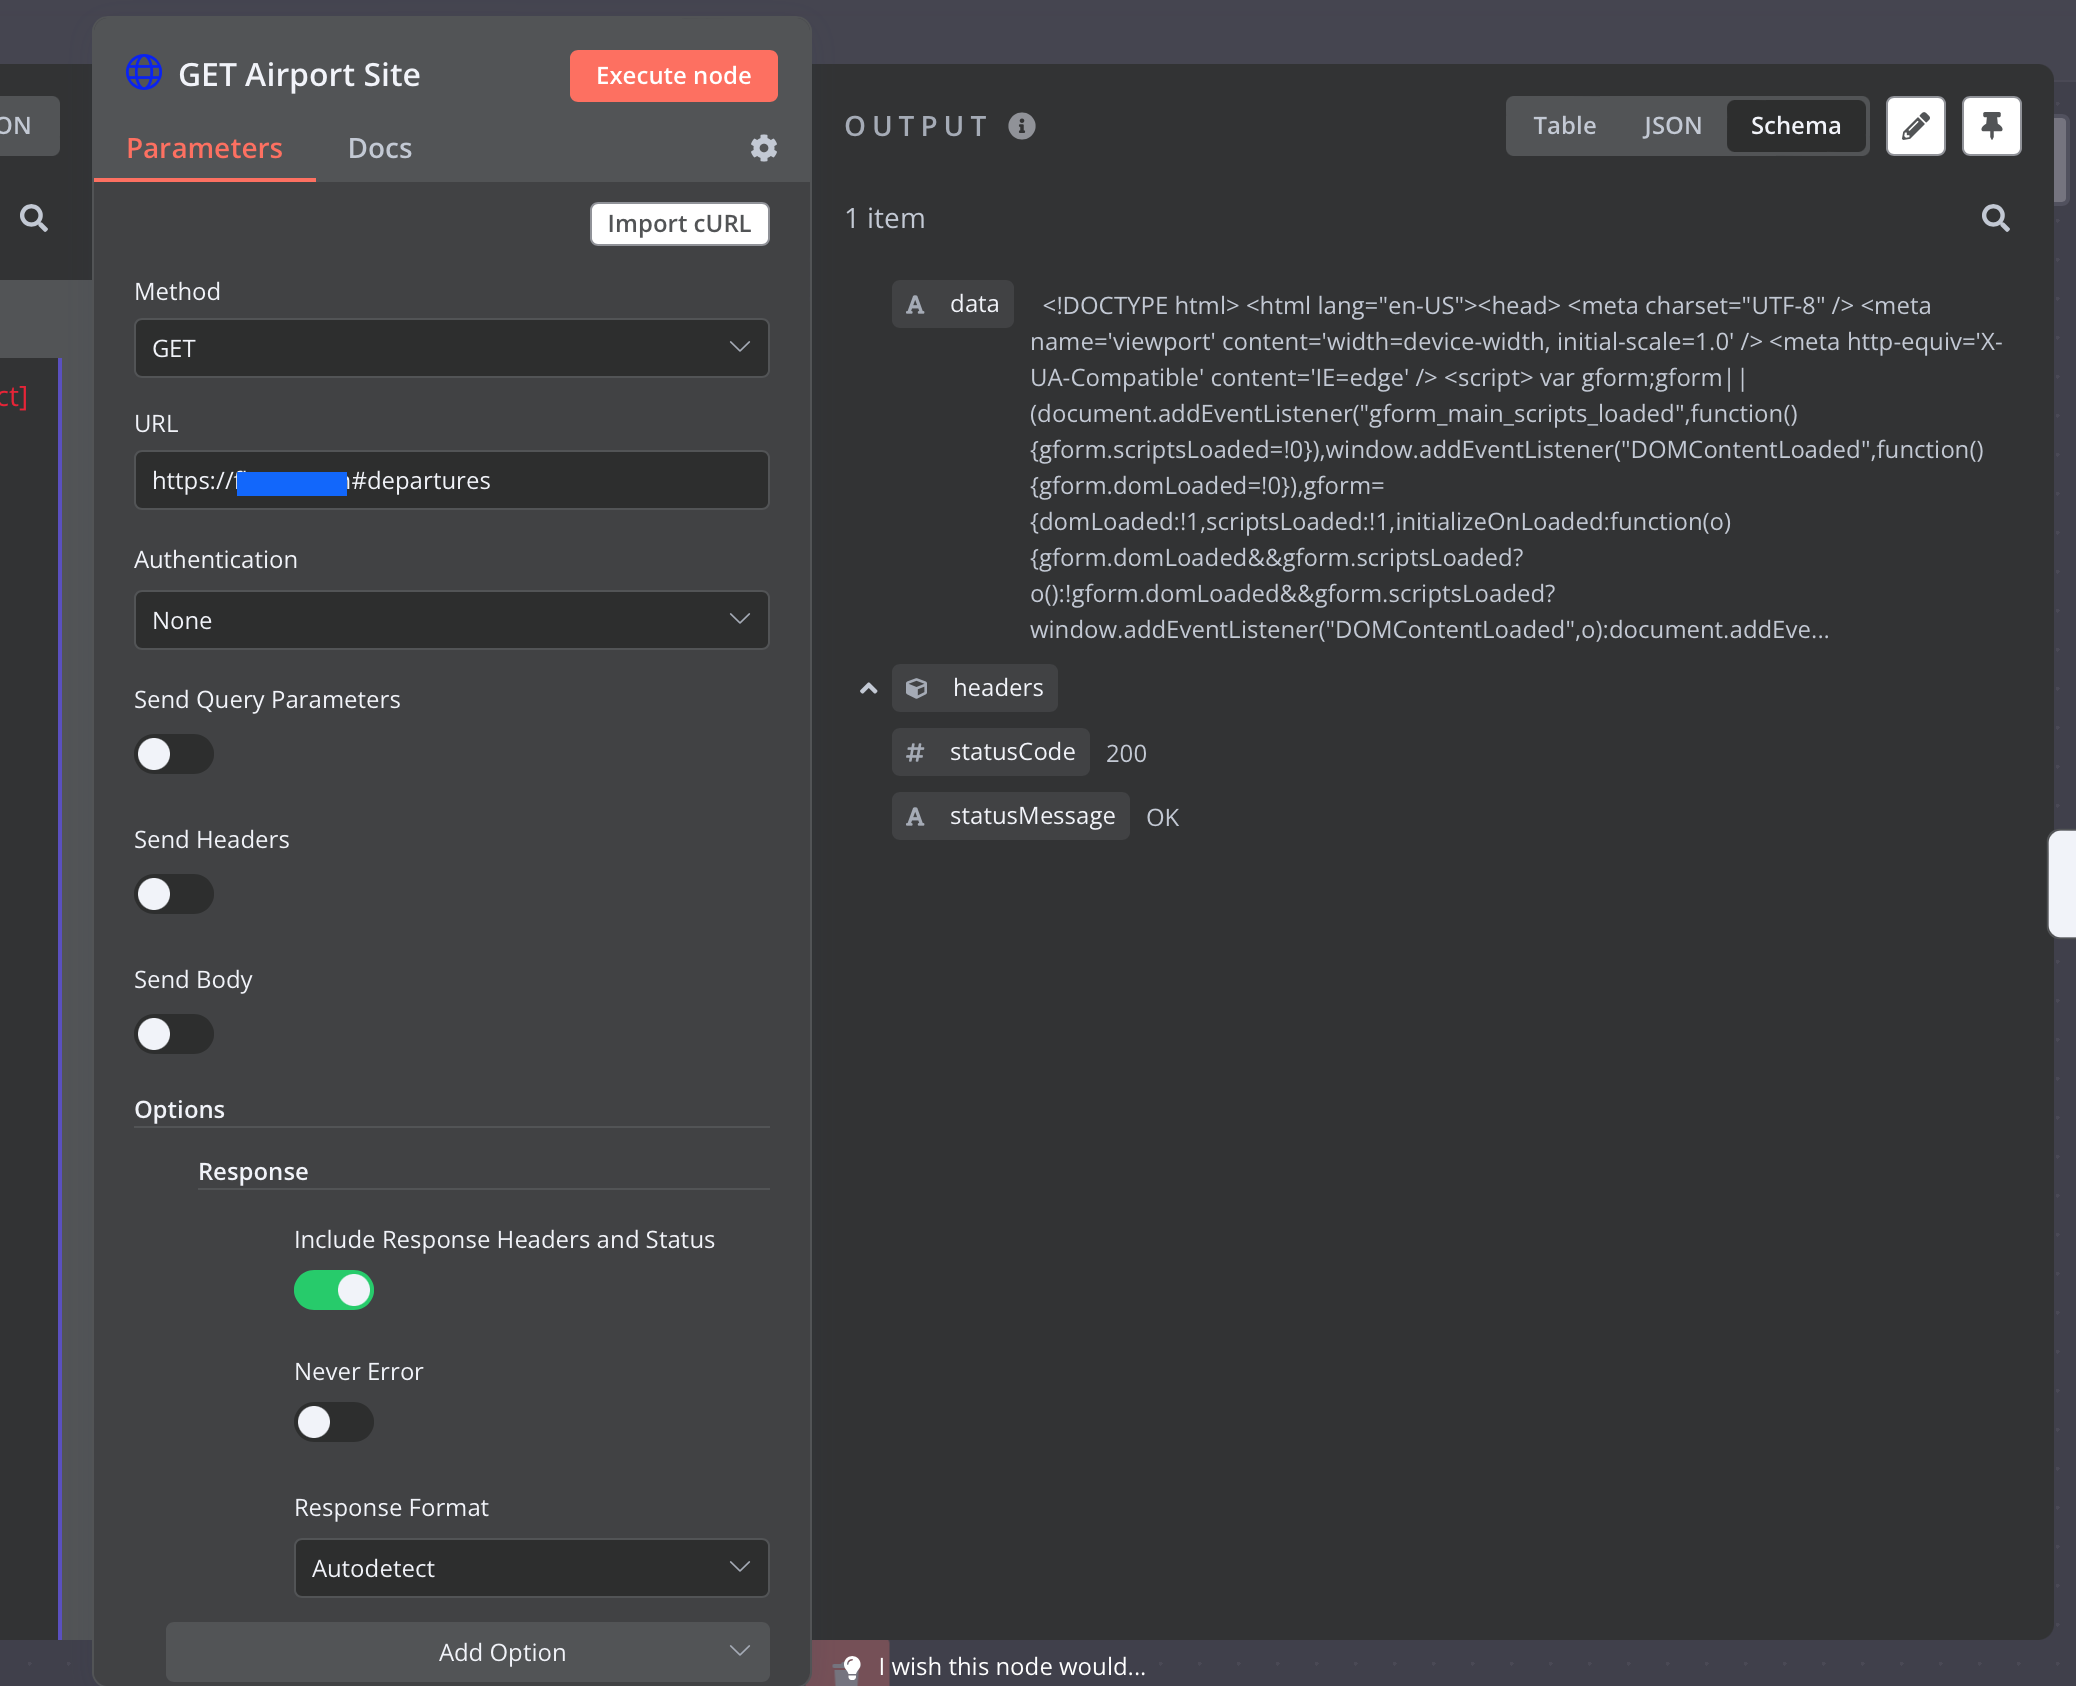
The response to the GET request gets assigned to the data property of the node’s output, and shown on the right side of the screenshot above. In other tools or raw scripts, this could be the raw response data, without getting assigned to its own property. Either way, our next step is to extract a specific section of that HTML response.
Step 3: Extract Table Element node#
Wading through raw HTML is no one’s idea of a good time, and the Extract HTML node within N8N needs us to target a specific CSS selector. Thanfully, visiting the airport’s website and right-clicking on the departing flights table lets us Inspect Element, which can usually make quick work of that.

This will pop open the browser console and show us the site’s code. It took a little bit of spot-checking through the element tree to find the best one to use, but in this case, the target element ID was #nav-departures.
Browsers vary
My screenshot above is from Safari, but Chrome, Firefox and Edge will each have options to find a CSS selector, usually by right-clicking on the element’s code in the console, and hitting “Copy”.
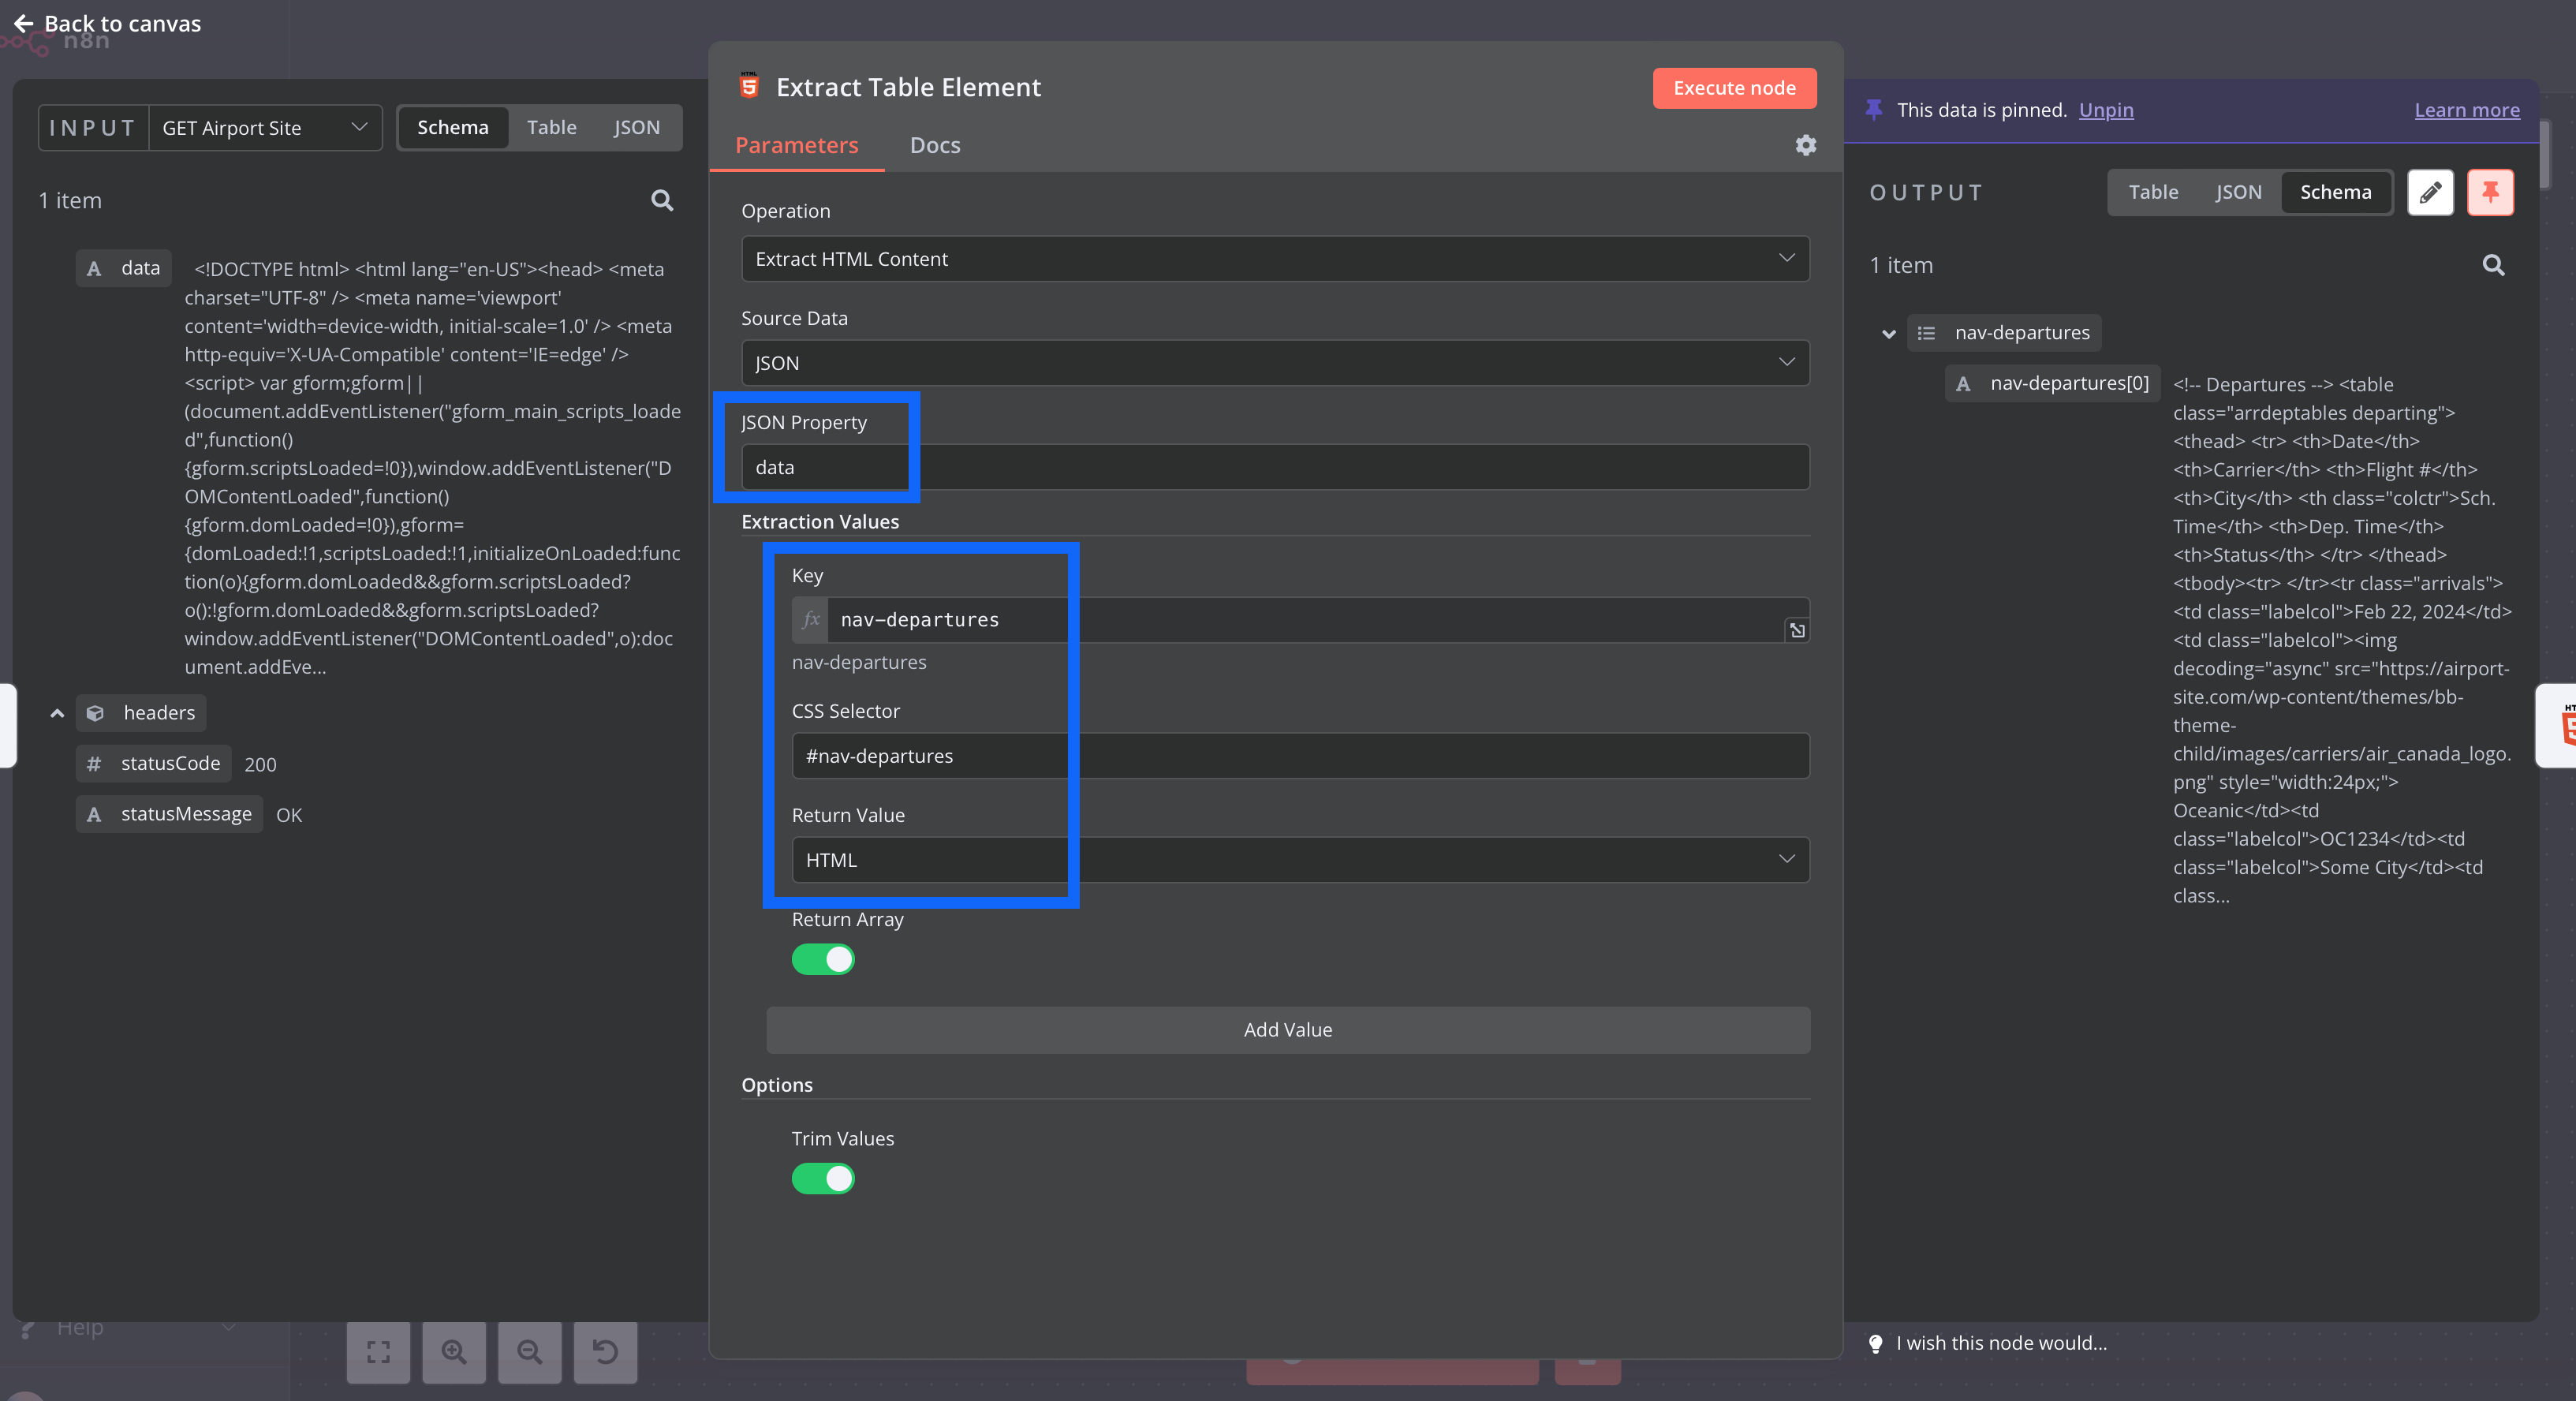
In the screenshot above, there are a few areas highlighted with blue squares. In step 2, N8N stored our response data in a property called data. This step reads the data property, and targets any of the extraction values we set in the section below. This extracted data is then passed as JSON in the output of this node. In our case, we want to target the #nav-departures selector that we found above, by entering it into the CSS Selector field. Just above that, note that we’ve assigned the key nav-departures to this extracted data, so we can use it in the next step.
Step 4: Generate HTML Template node#
We now have our table data, stored with the key nav-departures as the output of step 3. Since our end goal is to have a simple webpage to display the data, we need to create a basic HTML template that will properly block the section that we just in-elegantly carved from its original home. Again, N8N has a node for this. The HTML node can be used to generate a template, which will allow us to drop our key into some boilerplate website code. The default code that’s already loaded in the node also gives us a way to apply some basic styling, which is a good thing because that’s my least favourite part of any of these projects.
The quick and dirty HTML template used is here:
<!DOCTYPE html>

<html>
<head>
  <meta charset="UTF-8" />
  <title>Airport Departures</title>
</head>
<body>
  <div class="container">
      <h1>Airport Departures</h1>
        <div>
          <div style="margin-left:auto;margin-right:auto;">

            {{ $json['nav-departures'][0] }}

          </div>
        </div>
  </div>
</body>
</html>

<style>
.container {
  background-color: #ffffff;
  text-align: center;
  padding: 16px;
  border-radius: 8px;
  font-family: Arial, Helvetica, sans-serif;
}

table {
  margin-left: auto;
  margin-right: auto;
}

h1 {
  color: #658a4a;
  font-size: 24px;
  font-weight: bold;
  padding: 8px;
  text-align: center;
}

h2 {
  color: #909399;
  font-size: 18px;
  font-weight: bold;
  padding: 8px;
}

td, th {
  text-align: center;
  height: 24px;
  vertical-align: middle;
  padding: 16px;
}

th {
  background-color: #658a4a;
  color: white;
}

tr {
  border: 1px solid #fff;
  border-collapse: collapse;
}


arrdeptables.departing {
  text-align: center;
}
tr.arrivals:nth-child(even){background-color: #f2f2f2;}

</style>
I really don’t love dealing with CSS
So there’re likely errors, unused code, and feel free to make yours better :)
The most important part of this HTML template is here:
    ...
          <div style="margin-left:auto;margin-right:auto;">

            {{ $json['nav-departures'][0] }}

          </div>
    ...
The handlebars notation in the format, {{ something }}, describes a variable in N8N. The specific instruction it describes is to look up the node’s input (shown by $json), in the nav-departures key, and retrieve the first element in the array (described by [0]). In this case, it’s the data we just stored in that key, in the last step.
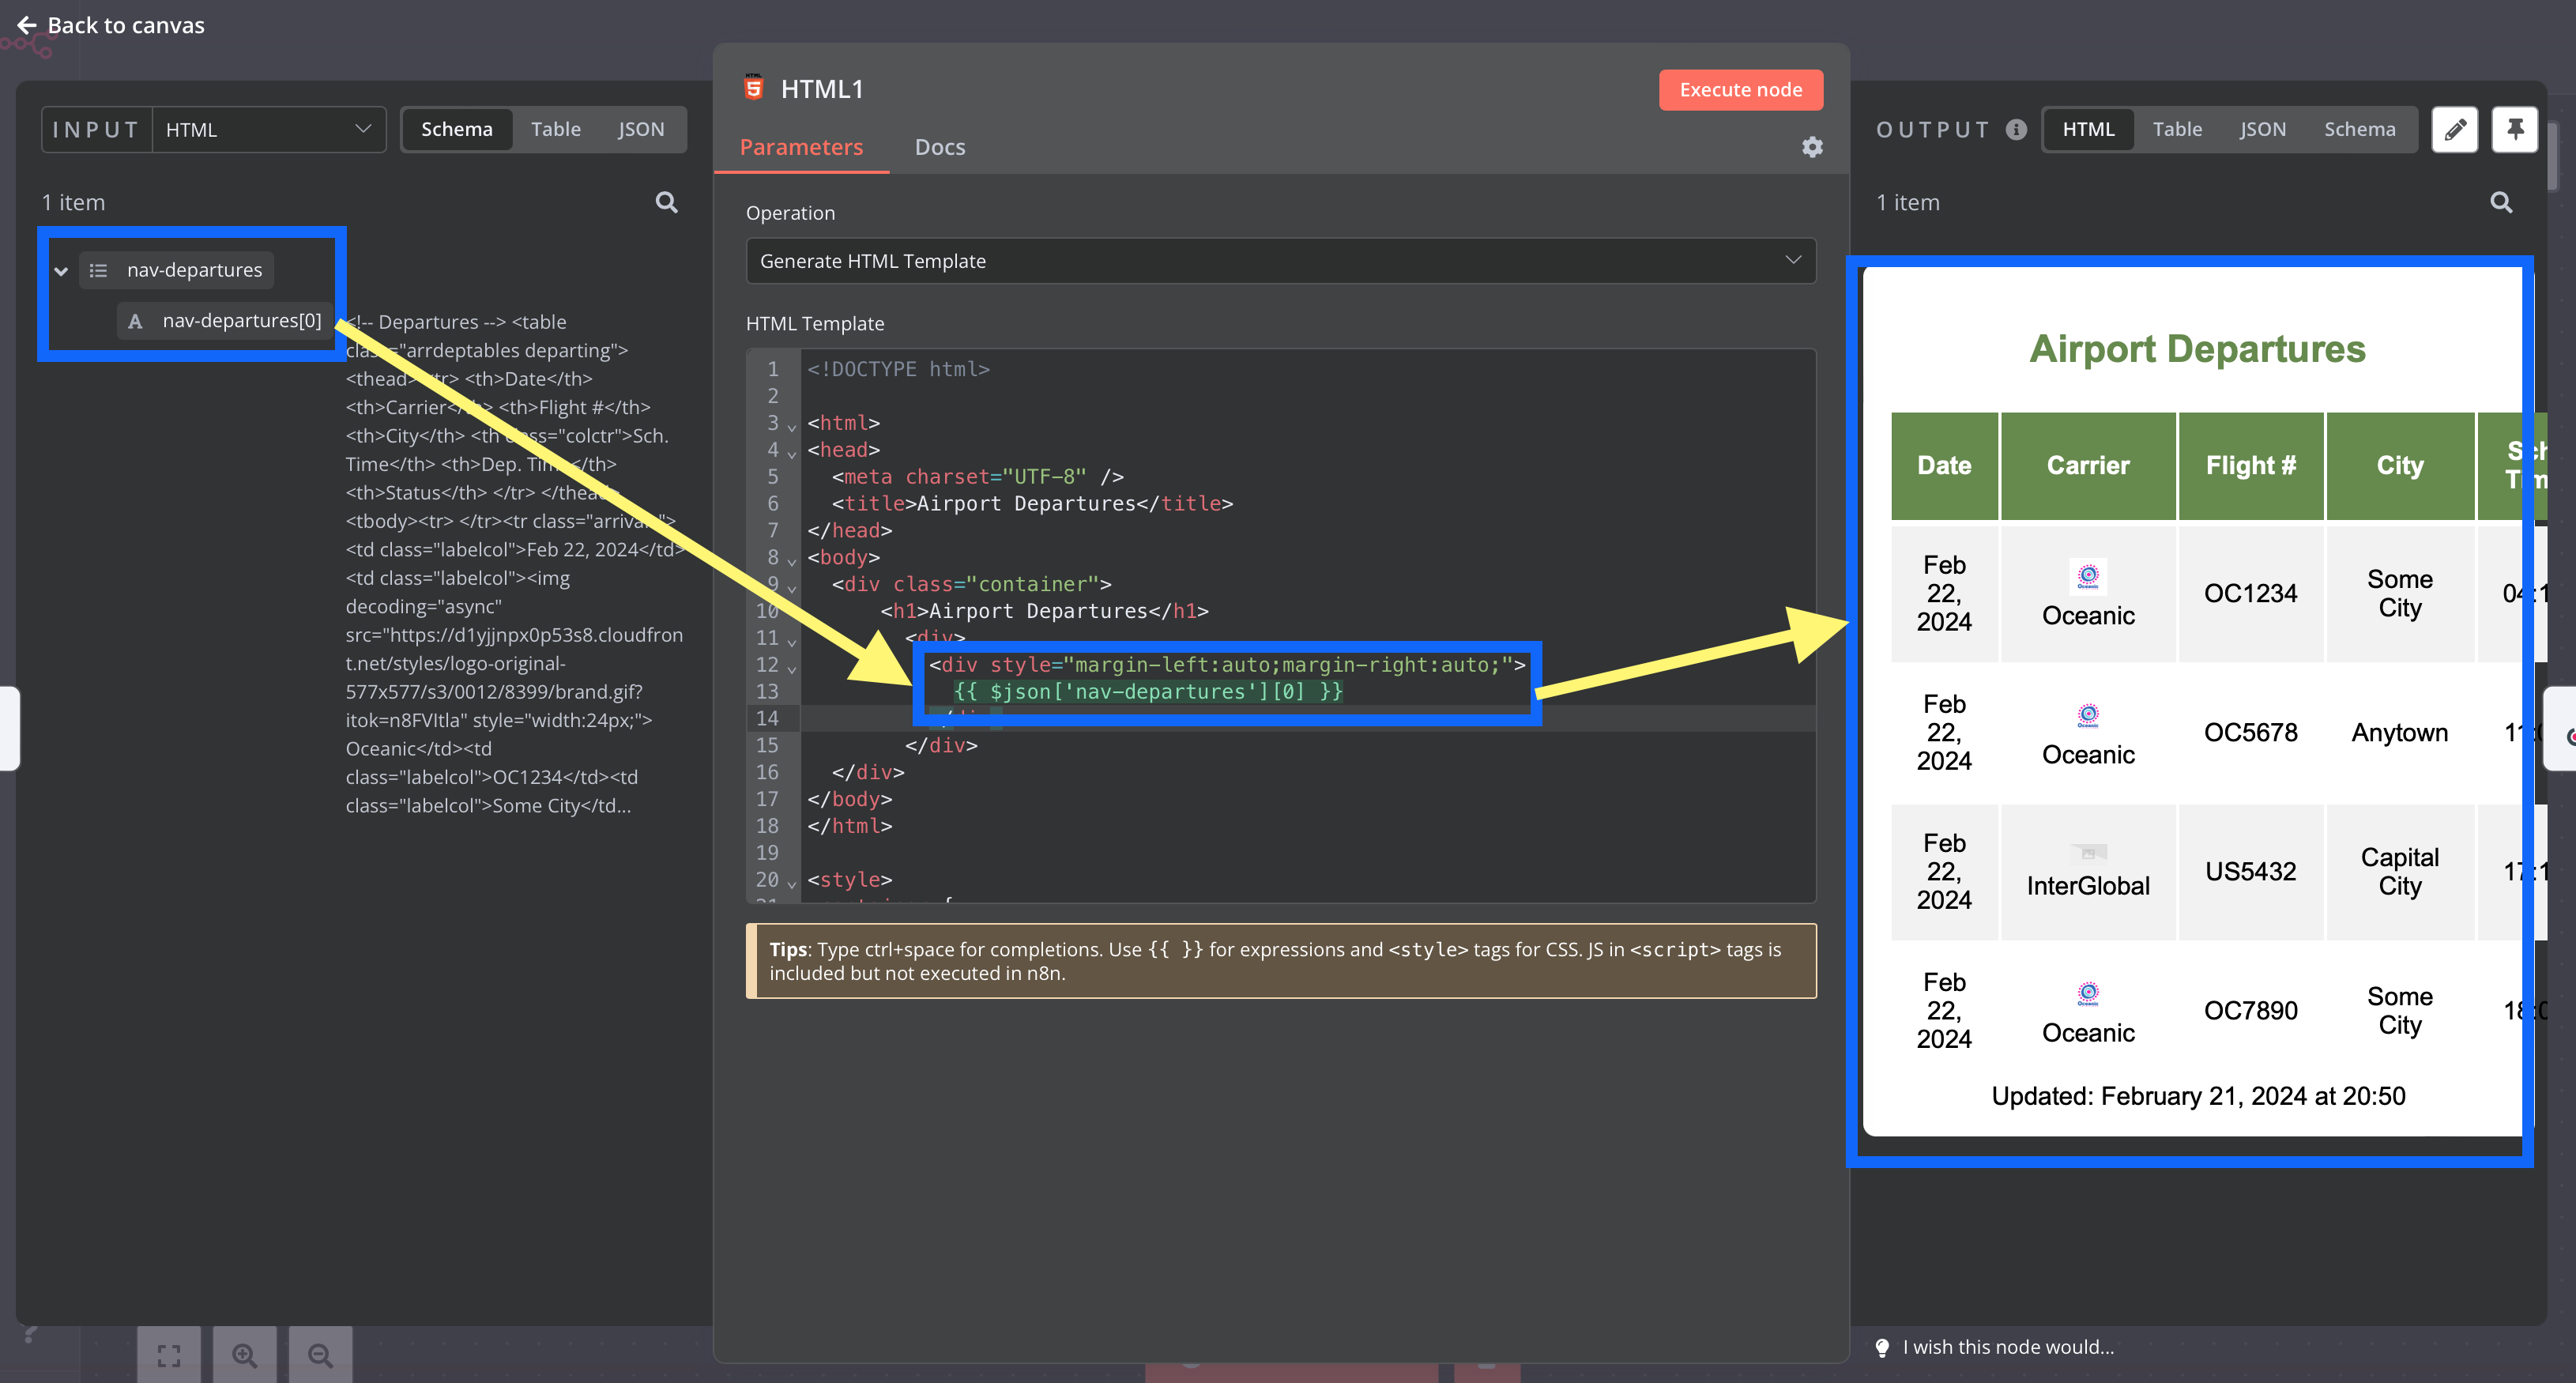
Within the Generate HTML Template node, our JSON input gets added directly into the base webpage template, to properly block the existing HTML that we pulled out of the airport’s main site. The <style> block in the HTML template sets up some simple formatting instructions to the table, and we can see a much prettier (if a little bit squashed) result in the output preview pane on the right side of that screenshot.
Did I tell you already that I don’t love CSS?
It can be annoying, but a couple small changes can make a huge difference in formatting. Getting the formatting rules in place to took longer than writing the code, or connecting the nodes, but I’ll begrudgingly admit that it was a good refresher.
Step 5: Respond to Webhook#
The output of our last node was a lot more appealling than the raw JSON information that we’ve been dealing with up until now. The only thing left to do is to pass this new template back to the original webhook URL, so our display screen can present it.
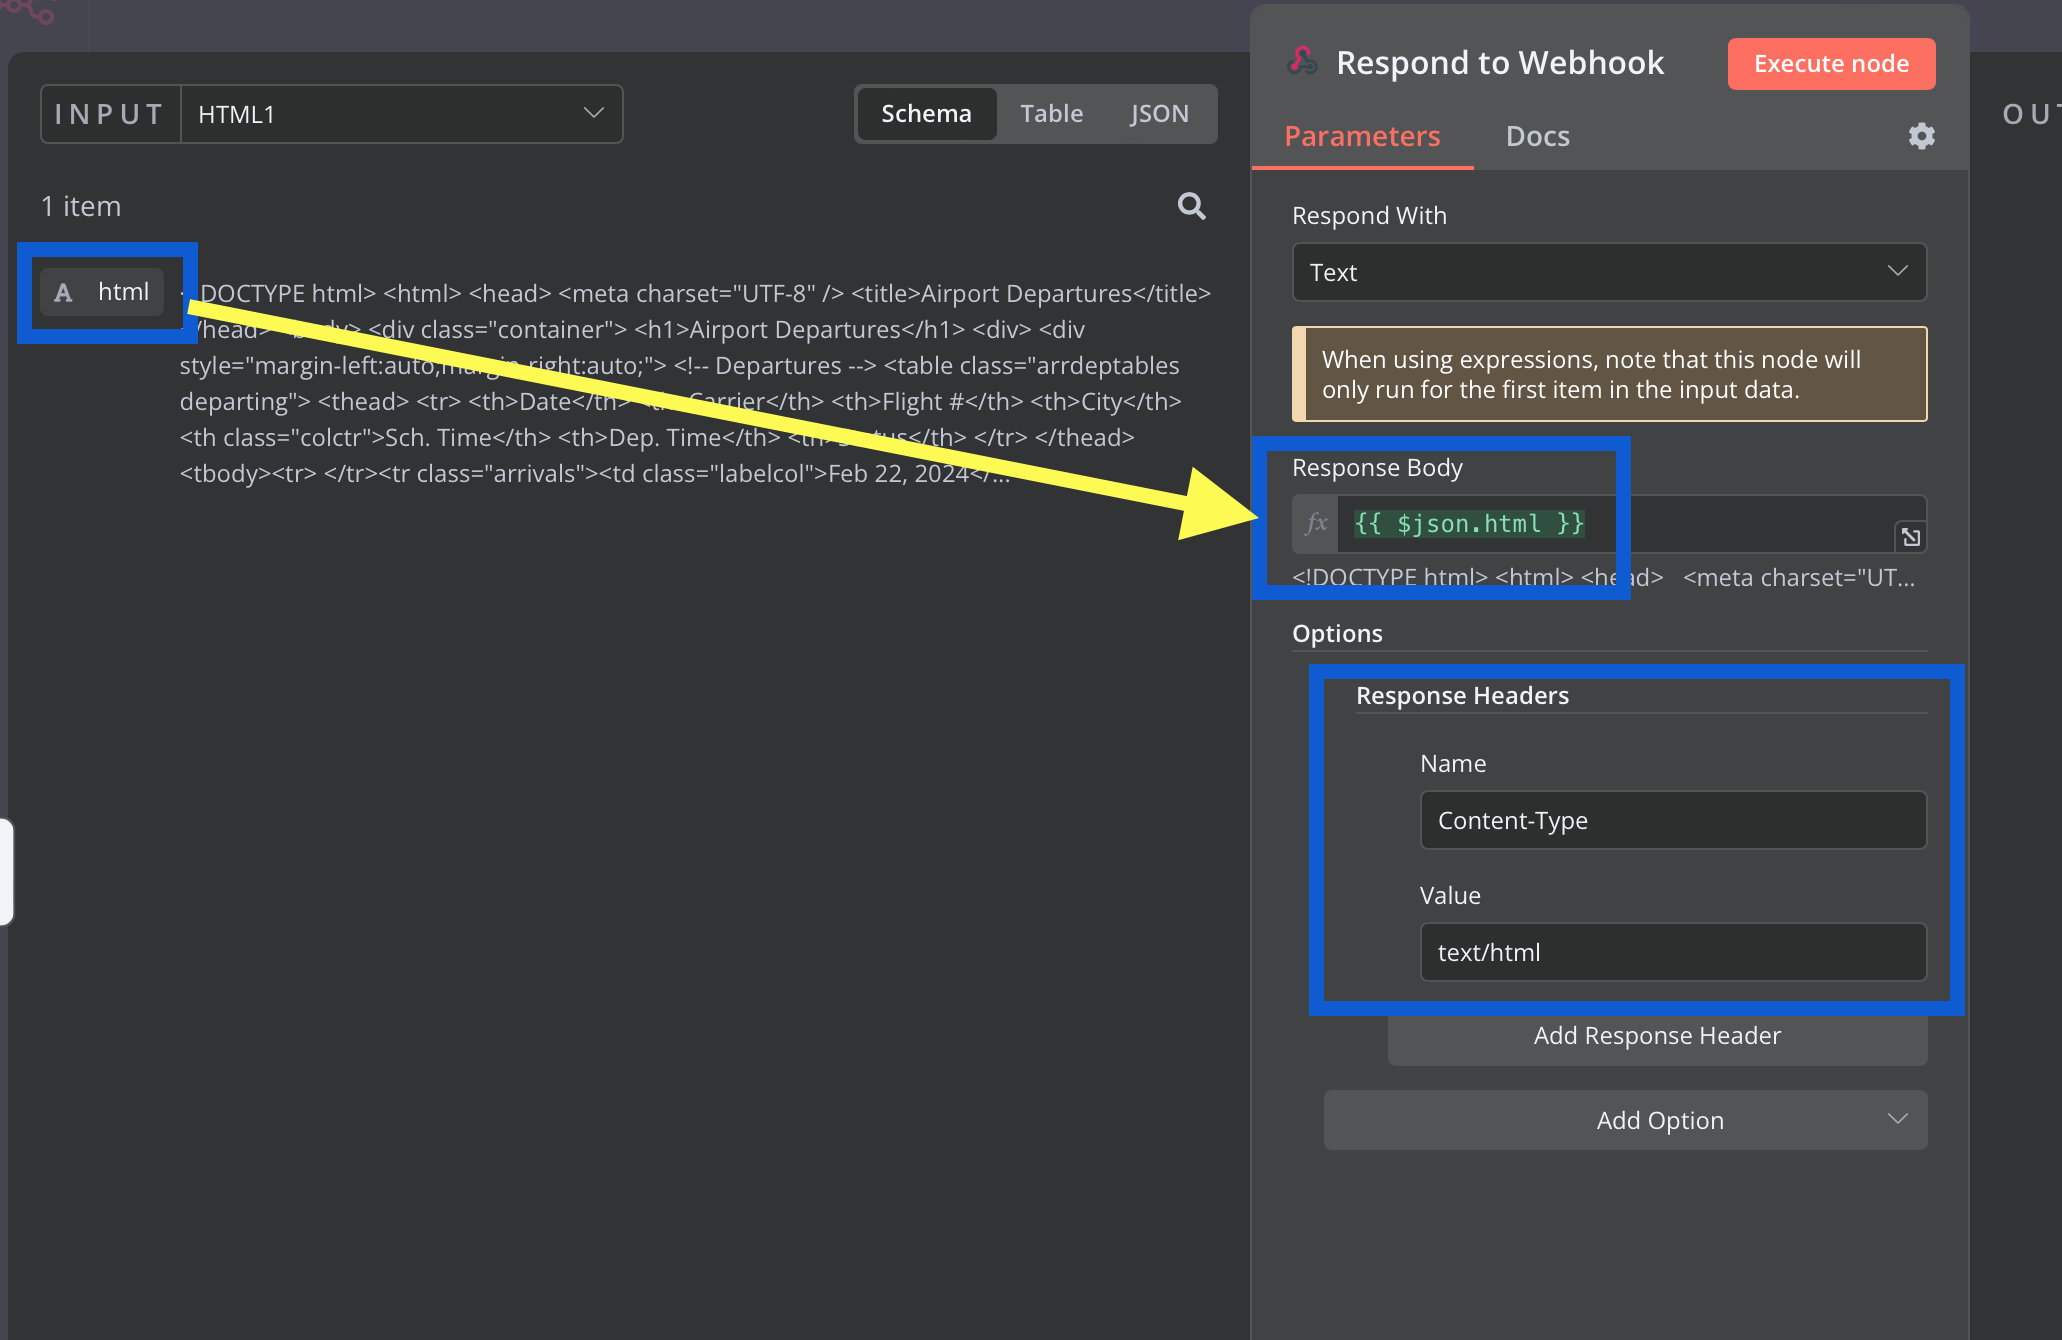
We can drag the input’s html property directly into the “Response Body” field inside the node, and we see that it automagically gets turned into the handlebars variable required by N8N. We also need to set an appropriate header within our response, to tell the web client to display this as an HTML page, rather than raw JSON. To do that, we have to add Content-Type as a header name, and text/html as the corresponding value. N8N will serve up the webpage to our end users, without any further hassle.
Final Approach#

Publishing and refining our flow#
After (saving and) publishing our flow within N8N, we can hit our new webhook with our browser, and we should see our new flight data table. N8N allows you to keep production and test data mostly separate, and you can safely iterate without interrupting your “live” version without much trouble. There are several ways that this simple flow can be extended or enhanced.
Error handling#
The most obvious and likely most important for an end user, is error handling! What happens if we can’t connect to the airport’s site? What happens if they change the CSS selector on their end? Our flow doesn’t have any way to surface errors currently, but that’s absolutely something you’ll want to consider as you build your own projects.
Asynchronous updates#
This flow waits until the webhook trigger is called, before doing any requests to the main site. An ideal flow would gather that information periodically, and storing it, without waiting for something to trigger a request to the external site. It would improve response time, and make it easier to handle errors before they’re made visible to an end user.
Pretty it up#
This particular table relies on the airport doing nearly all of the data transformation; we just slap a bit of styling over top. Now that the basics are done, though, we could do some more substantial reformatting, like colour-coding delayed flights or changing the header information. Combined with a few of the other refinements above, we could even enrich the page with information from other sources, like the current weather at a flight’s destination.